
The main feature of this product is it comes with an adjustable clamp by tightening the screw. It works with different types of fabrics, from thin cotton canvas to thick linen.
Linen canvases are generally nailed on the sides of wooden stretcher bars with short tacks. In other cases, aluminum frames are chosen for preserving purposes or the canvas is mounted on a wooden panel by gluing with a medium.
However, wooden stretcher bars are still most commonly used because of some reasons like expensive frames, time-consuming gluing process, and heavy panels.
Moreover, some art supply stores sell stretched canvases on wooden frames. Some of you may have used these canvases in art classes in school. However, there is a slight disadvantage to using this type of canvas because the tacks on the sides are visible when hung on a wall.
Although it may be acceptable as a study piece or with framing, it is a little awkward and annoying when hanging on the wall by itself or painting on the sides of the canvases.
Therefore, the best way is to stretch canvases with the “gallery wrap.” Wrapping the canvas all the way around the frame and stapling it on the back can keep the tension of the canvas’s surface like the one in the image below.

The following are the suggested tools and materials for stretching canvas with the gallery wrap technique.
・Cut canvas
・Wooden stretcher bars
・Canvas pliers
・Staple gun
・Staples
・Pencils (B or darker)
・Ruler
・Utility knife
The size of the canvas needs to be larger than the size of the frame. For example, I prepared a cut canvas for an F15 size (652×530mm) in order to stretch on an F10 size (530x455mm) wooden frame. Although the needed size may vary depending on the thickness of the frame as well, canvas needs a margin of around 75mm to 100mm for a typical wooden frame.
A staple gun is an architectural tool for stapling carpets and other thick fabrics to walls and floors. It is convenient since you can use it with one hand.
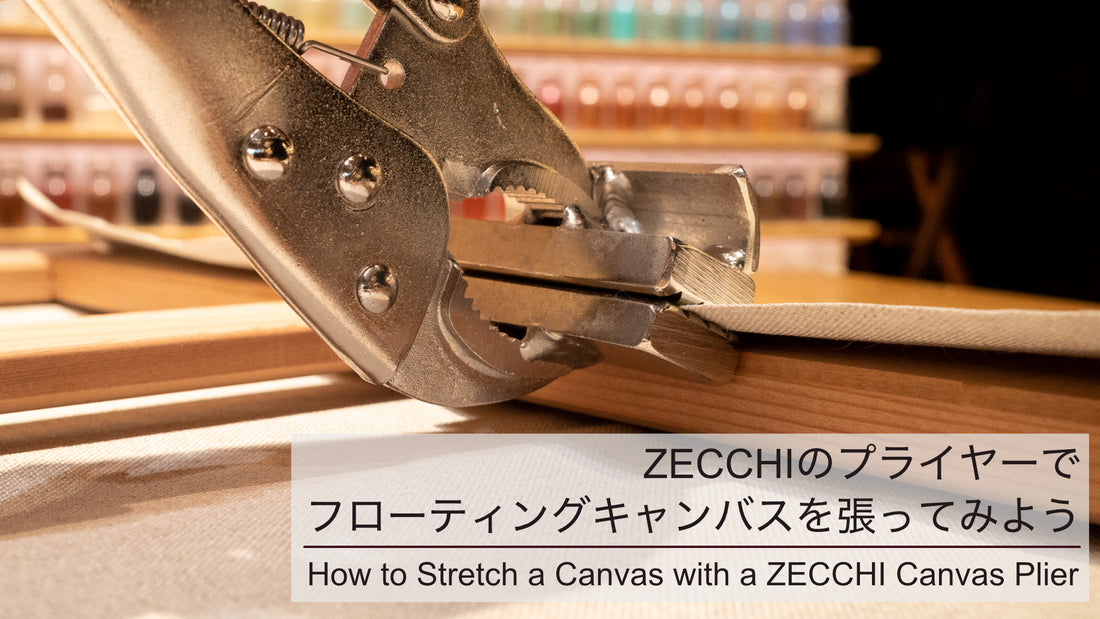
For stretching a canvas, ZECCHI’s canvas plier is highly recommended.
The main feature of this product is it comes with an adjustable clamp by tightening the screw. It works with different types of fabrics, from thin cotton canvas to thick linen.

This product is available in large and small sizes, the width of the large size is 115mm and the body length is 420mm, and the width of the small size is 65mm and the body length is 240mm.
The smaller model is good for size F30 canvas while the larger model can be used for larger canvases.

Here is a picture of the pliers in the open position. The lower handles can lock the plier in a closed position, making it easy for people with small hands or weak strength to pull the cloth.

Now let's stretch the canvas.
① Measuring and Cutting
Place a wooden frame on the center of the canvas and cut the canvas by leaving enough margin to wrap it to the backside of the frame. Also, remember to face the canvas and the wooden frame down to keep the surface clean.
To stretch the canvas on the Maruoka's stretcher bars type A, I left 75 mm from the outside of the frame to the edge of the canvas.
Of course, the larger the frame, the wider the margin is needed.
Please note that, if the canvas is too big, it gets in the way when stretching it; when it’s too small, it does not reach the frame, so measuring it in appropriate size according to the size of the frame is necessary.
② Marking and Positioning
Draw a line along the outline of the wooden frame, extending and intersecting each of the long and short sides.
The lines should be extended to the edge of the canvas.
Make a small mark outside the contact point where the canvas and the corner of the back side of the wooden frame meet when the corner of the canvas is folded perpendicular to the corner of the frame.
If you mark lower than the frame, you will not be able to get a proper margin, and the wooden frame will be visible when you fold the corners of the canvas which loses the point of having a canvas on the sides of the frame. It is better to have a little extra margin when marking the position.

Draw a curve from the marked point to the contact point of each extended linen and the edge of the canvas. Then cut inside the circle. This will prevent the canvas of four corners from becoming too thick.
③ Stretching from the Center
Fix the canvas with a staple gun and a plier starting from mark ①.
Then, staple the canvas by following the diagonal lines in the picture below without pulling too hard in one direction, so the tension will not be uneven. Although this picture only shows up to the sixth position, it is important to follow the diagonal order while stapling the canvas.

When stretching the canvas, apply tension to the sides of the frame as the picture shows. This plier has firm upper and lower pinching parts so it is easy to use.

④ Side Folding
Check the tension of the surface while you stretch it to make sure there is no unevenness. Once you have progressed to a certain point, decide which side you will fold the canvas into and make a simple folding mark first. Fold the canvas in as if it were a right-angled triangle touching the side of the wooden frame.

Now comes the finishing part. Staple the non-folded sides first. The corners can be neatly stretched by cutting the areas with a cutter knife.

⑤ Finish
When the four corners are folded and the surface is nicely stretched, it is ready for painting.

Quick tips: If the tension is still weak or wrinkling has occurred, remove the staples and try to stretch the canvas again.

Compared to nailing with tacks on the sides, it requires adjusting the tension and is more difficult to stretch neatly. However, this method allows you to express yourself in ways that are not possible with the normal stretching method, such as applying color to the sides of the canvas or exhibiting without a frame.
Practice makes perfect, therefore, the more you frame the more you will get used to it!
Translated by Atsumi Okano and Nelson Hor Ee Herng
PIGMENT TOKYO Art Materials Experts
Art Materials Expert at PIGMENT TOKYO
Akira Oya
Born in 1989 in Tokyo. Master of Fine Art and Design at Nihon University College of Art.
He also continues his career as a visual artist.
Born in 1989 in Tokyo. Master of Fine Art and Design at Nihon University College of Art.
He also continues his career as a visual artist.